
Resilvering a mirror involves restoring its reflective coating. This process can make old mirrors look new again.
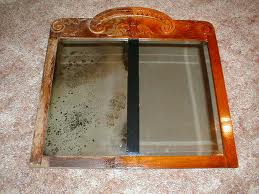
Mirrors lose their luster over time. Scratches and dark spots appear, reducing their beauty. Resilvering can help fix this. It’s a way to breathe new life into a cherished piece. The process may seem complex, but it’s doable with the right steps.
Whether you have an antique mirror or just want to fix a current one, this guide will help. You’ll learn how to prepare, apply, and finish the resilvering process. Let’s dive into the steps to make your mirror shine again.

Credit: m.youtube.com
Tools And Materials
Resilvering a mirror can be a fun and rewarding DIY project. It requires specific tools and materials to achieve the best results. In this section, we will explore the essential tools and required materials for this task.
Essential Tools
Having the right tools is crucial for any project. To resilver a mirror, you will need the following:
- Safety glasses: Protect your eyes from potential hazards.
- Gloves: Keep your hands safe from chemicals and sharp edges.
- Soft brush: Use it to clean the mirror surface gently.
- Plastic scraper: Remove the old silver layer without scratching the glass.
- Masking tape: Cover areas that you do not want to treat.
- Spray bottle: Apply solutions evenly on the mirror.
Required Materials
Besides tools, having the right materials is just as important. You will need:
- Silvering solution: This re-coats the glass with a reflective layer.
- Reducing agent: Helps the silver adhere to the glass.
- Cleaning solution: Prepares the mirror surface for silvering.
- Distilled water: Use for rinsing the mirror to avoid spots.
- Protective coating: Seals the new silver layer for durability.
Safety Precautions
Resilvering a mirror can be a rewarding task. But it’s crucial to follow safety precautions. These precautions protect you from harm and ensure a smooth process. Below, we outline key safety measures to keep in mind.
Protective Gear
Always wear protective gear. Start with safety goggles to protect your eyes. Chemicals used in resilvering can cause eye irritation or damage. Use a face mask to avoid inhaling fumes. Gloves are essential. They protect your hands from cuts and chemical burns. Choose gloves that are resistant to the chemicals you will use. Wear old clothes or a protective apron. Splashes can ruin your clothes.
Work Environment
Choose a well-ventilated area for your work. Fumes from chemicals need to dissipate. An open window or exhaust fan can help. Ensure your workspace is clean and clutter-free. This reduces the risk of accidents. Have a fire extinguisher nearby. Some chemicals are flammable. It’s best to be prepared for any emergency. Keep children and pets away from the work area. Their safety is paramount.
Preparation
Resilvering a mirror can give it a fresh, new look. Proper preparation is essential for success. Follow these steps to ensure your mirror looks as good as new.
Cleaning The Mirror
Start by cleaning the mirror thoroughly. Use a gentle glass cleaner to remove any dirt or grime. Spray the cleaner on a soft cloth, not directly on the mirror.
- Wipe the surface in a circular motion.
- Ensure all spots and smudges are gone.
- Dry the mirror with a lint-free cloth.
Removing The Old Silver
Next, you need to remove the old silver from the mirror. This step is crucial for a smooth finish. Use a paint stripper or a silver remover.
- Apply the stripper to the back of the mirror.
- Let it sit for the recommended time.
- Scrape off the old silver using a plastic scraper.
Be careful not to scratch the glass. After removing the old silver, clean the glass again to remove any residue.
| Materials Needed | Purpose |
|---|---|
| Gentle Glass Cleaner | Remove dirt and grime |
| Soft Cloth | Wiping the mirror |
| Paint Stripper | Remove old silver |
| Plastic Scraper | Scraping off silver |
| Lint-free Cloth | Drying the mirror |
These steps ensure a clean surface for the new silver layer. Proper preparation is key to a successful mirror resilvering project.
Applying The Silver
Resilvering a mirror can breathe new life into an old, tarnished piece. Applying the silver is the most critical step. It requires precision and patience. Below, we’ll guide you through the essential stages of this process.
Mixing The Silver Solution
The first step is to mix the silver solution. This solution will create a reflective layer on the mirror’s surface.
- Get a silvering kit from a reputable supplier.
- Prepare all the necessary equipment: clean containers, distilled water, and the silvering chemicals.
- Follow the instructions provided in the kit to mix the solution.
- Ensure the mixture is even and free of lumps.
Proper mixing is crucial. It ensures a smooth and reflective coating.
Coating The Mirror
Once the solution is ready, it’s time to coat the mirror. This is a delicate process, so take your time.
- Lay the mirror flat on a clean, dust-free surface.
- Use a soft brush to apply the silver solution evenly across the surface.
- Make sure to cover all areas without missing any spots.
- Allow the silver to settle and bond with the glass.
- Gently rinse the mirror with distilled water to remove any excess solution.
After coating, let the mirror dry completely. This might take a few hours. Ensure no dust or debris lands on the surface during this time.
Once dry, inspect the mirror for any imperfections. If necessary, repeat the coating process to achieve the desired reflectivity.
By following these steps, you can restore your mirror’s shine and clarity. Happy resilvering!
Drying And Curing
Resilvering a mirror involves several steps. One crucial stage is the drying and curing of the new reflective coating. Proper drying and curing ensure the mirror’s longevity and durability. This section will guide you through the drying time and curing techniques required for a flawless mirror finish.
Drying Time
The drying time is vital for a smooth and shiny mirror surface. After applying the silvering solution, the mirror needs adequate time to dry. Typically, the drying process takes about 24 to 48 hours. Keep the mirror in a dust-free environment during this period. Dust particles can ruin the reflective coating.
Ensure the room has proper ventilation. Good airflow speeds up the drying process. Avoid direct sunlight or heat sources. These can cause the coating to dry unevenly. Use a fan to circulate air if necessary. A consistent temperature helps the coating dry evenly.
Curing Techniques
Curing is the process of hardening the reflective coating. This step is essential for a durable and lasting mirror. Follow these curing techniques for the best results:
- Temperature Control: Maintain a stable room temperature. Ideal curing temperature ranges between 65-75°F (18-24°C).
- Humidity Levels: Keep humidity levels low. High humidity can affect the curing process.
- Time Frame: Allow the mirror to cure for at least 7 days. This ensures the coating has fully hardened.
- Protective Measures: Avoid touching the mirror during the curing period. Fingerprints can damage the coating.
Following these steps will help you achieve a perfect finish. Proper drying and curing are key to a successful mirror resilvering project.
Credit: bearglassblog.com
Final Touches
Resilvering a mirror is an art. The final touches can make a big difference. Attention to detail ensures a smooth and reflective finish.
Polishing The Mirror
Once the new silver layer is in place, polish the mirror. Use a soft, lint-free cloth. Apply gentle, circular motions. This ensures an even shine. Avoid harsh chemicals. They can damage the new surface. A mixture of water and mild detergent works best.
Inspecting For Flaws
After polishing, inspect the mirror carefully. Look for any scratches, bubbles, or streaks. Use natural light for best results. Any flaws can affect the reflection quality. If you find any issues, address them immediately. Sometimes, a second round of polishing can help. Ensure there is no dust or debris on the surface.
Maintenance Tips
Maintaining a re-silvered mirror ensures it stays beautiful for years. Proper care prevents damage and keeps your mirror looking new. Follow these simple tips to maintain your re-silvered mirror effectively.
Regular Cleaning
Clean your mirror weekly to prevent dust buildup. Use a soft, lint-free cloth to avoid scratches. Spray a small amount of glass cleaner on the cloth, not directly on the mirror. Wipe the surface gently, focusing on any smudges or fingerprints.
Protective Measures
Place mirrors in areas with stable temperatures. Avoid placing them near heat sources or in damp environments. Use a dehumidifier in humid rooms. This prevents moisture from affecting the mirror’s silver layer. Add a frame to protect the mirror edges from chipping. Always handle mirrors with care to prevent accidents.

Credit: www.eatsleeplive.co.uk
Frequently Asked Questions
What Is Mirror Resilvering?
Mirror resilvering is the process of restoring the reflective coating on the back of a mirror. This involves removing the old silver coating and applying a new one. It helps to revive the mirror’s original clarity and shine.
How Do You Resilver A Mirror?
To resilver a mirror, first, remove the backing paint and old silver. Clean the glass thoroughly, then apply a new silvering solution. Finally, seal the new coating with protective paint.
Can You Resilver A Mirror At Home?
Yes, you can resilver a mirror at home with a resilvering kit. However, it requires patience and precision. Follow the instructions carefully for the best results.
What Materials Are Needed For Mirror Resilvering?
For mirror resilvering, you need a resilvering kit, protective gloves, cleaning supplies, and a well-ventilated workspace. Ensure you have all materials ready before starting the process.
Conclusion
Resilvering a mirror can be a rewarding DIY project. It restores its shine and saves money. Follow the steps carefully for the best results. Patience and attention to detail are key. Gather all needed materials before starting. Safety is important; wear gloves and protective eyewear.
Enjoy the satisfaction of bringing your mirror back to life. Your mirror will look almost new again. Happy crafting!

My name is Carson Mackey and I specialize in mirror/glass. With over 8 years of experience in the glass/mirror industry, I am well-versed in all aspects of fabrication, repair and installation. I take great pride in providing my clients with the best quality of service and products. I am passionate about my work and strive to help my clients realize their vision.
Honestly, I am dedicated to providing the best services and products to my customers and I’m always open to learning new techniques and working with advanced materials. Basically, this is a place where I will share my thoughts and experiences on Mirror. And this website (http://mirrortopics.com) is an outlet of my deep passion for Mirror.
I want to clear about MirrorTopics that it’s not any agent or hired organization. It fully customize by me. So I hope, posted information will Realistic and authentic. Although I will do enough research before posting but if you notice any wrong or mistake on my article, please contact with me without any hesitation. As well as you can suggest me about content quality, authentication and so on by using our Contact US page. Thank you my friend to support me.