
Want to add a touch of whimsy to your home? Making a funhouse mirror is easier than you think.
Creating your own funhouse mirror can be a fun and rewarding project. These mirrors, known for their wacky, distorted reflections, are great for parties or just for laughs. You don’t need special skills or expensive materials to get started. With a few basic tools and some creativity, you can craft a mirror that will bring smiles to everyone who sees it.
In this guide, we’ll walk you through the process step by step, ensuring your project is a success. Get ready to explore the fun and quirky world of DIY funhouse mirrors!
Introduction To Funhouse Mirrors
A funhouse mirror is a special type of mirror. It distorts your reflection. This makes you look funny. Your body parts may appear bigger or smaller. Some parts might look stretched or squished. This makes people laugh.
Funhouse mirrors have been around for a long time. People used them in old carnivals and fairs. These mirrors made the funhouses exciting. They were a big hit with kids and adults. Today, you can find them in amusement parks. They are still very popular. They bring joy and laughter to many.

Credit: www.unlockedmind.com
Materials Needed
To make a funhouse mirror, you need some basic supplies. Start with a large mirror. You also need cardboard or wood to make a frame. Get some plastic sheeting that can bend. You will need glue or tape to hold things in place. Gather some scissors and a ruler for measuring.
For extra fun, you can add some colorful paint. Use stickers to decorate the frame. Add LED lights around the edges for a cool effect. Use glitter or sequins for a shiny look.
Choosing The Right Mirror
Mirrors come in many types. Flat mirrors are common. Concave mirrors curve inward. Convex mirrors curve outward. Each type bends light differently. This creates unique effects.
For a funhouse mirror, flexible acrylic sheets work best. They are easy to bend. You can shape them in various ways. This makes them ideal for DIY projects. Acrylic mirrors are also lightweight. They are safer than glass. You can cut them with simple tools. Choose a mirror with a reflective coating. This will give the best effect.
Creating The Frame
Begin by constructing the frame for your funhouse mirror. Use lightweight materials like wood or plastic. Ensure the frame is sturdy and fits the desired mirror size.
Frame Materials
You need a sturdy frame for your mirror. Wood, metal, or plastic are good choices. Wood is easy to cut and shape. Metal is strong and lasts long. Plastic is light and affordable. Choose the material that suits you best. Make sure it’s strong enough to hold the mirror.
Building The Frame
First, measure the size of the mirror. Cut the frame material to fit the mirror size. Use nails or screws to put the frame together. Make sure all corners are tight and secure. Sand the edges to avoid splinters. Paint or decorate the frame if you like. Let the paint dry completely before moving on.
Preparing The Mirror
Create a funhouse mirror by carefully bending a reflective sheet. Use light pressure to achieve the desired curves. Secure the edges to maintain the shape.
Cleaning The Mirror
Start by cleaning the mirror with a soft cloth. Use a gentle glass cleaner. Spray a small amount on the cloth, not directly on the mirror. Wipe in circular motions. This removes dust and fingerprints. Make sure the mirror is completely clean.
Safety Precautions
Always wear protective gloves. They keep your hands safe. Use a mask to avoid inhaling fumes. Work in a well-ventilated area. This prevents dizziness. Keep tools and materials out of reach of children. Safety is the top priority.
Credit: www.youtube.com
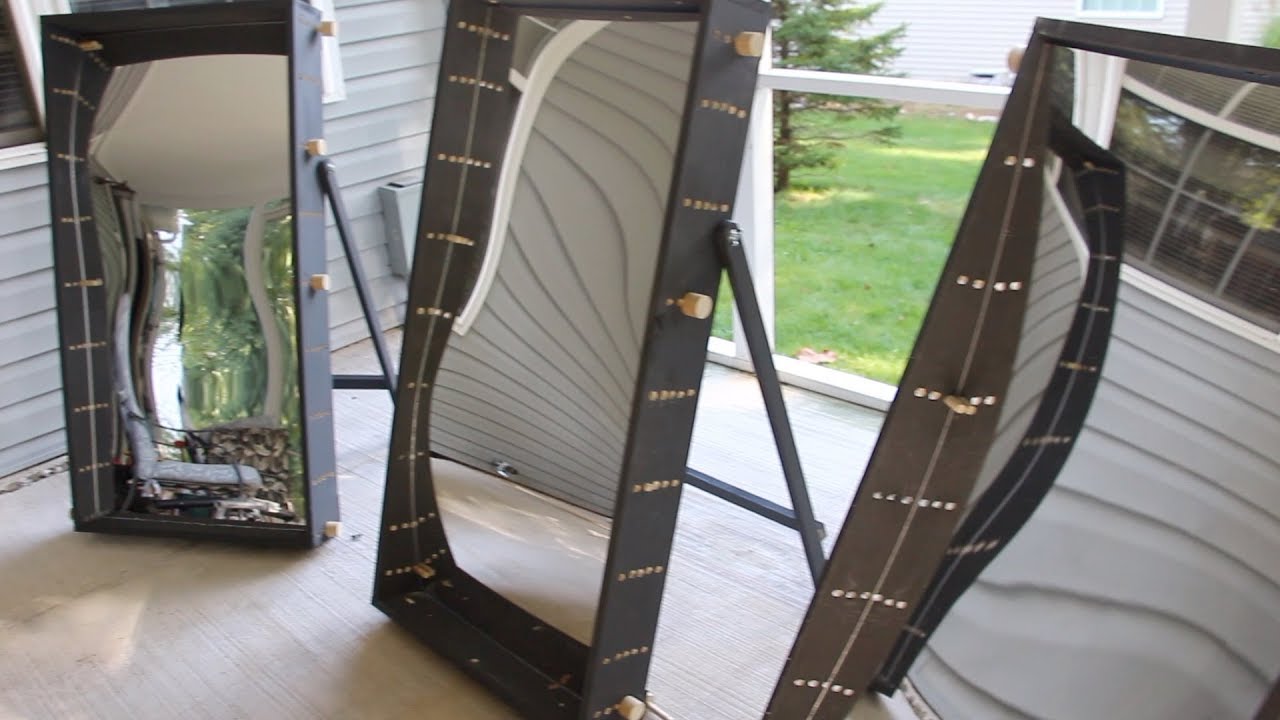
Shaping The Mirror
Making a funhouse mirror is simple. First, heat the mirror using a heat gun. Hold the gun around 10 inches away. Move the gun in small circles. This will soften the mirror. When the mirror is warm, you can start bending it. Be careful. The mirror can break if bent too fast.
Wear gloves to protect your hands. Use a mold to shape the mirror. Press the mirror into the mold. Hold it until it cools down. Once cooled, the mirror will keep its new shape. Repeat this process if needed. Make small adjustments for the best result.
Mounting The Mirror
Secure the funhouse mirror to the wall using sturdy brackets. Ensure it’s level for the best distorted effect.
Attaching To Frame
Secure the mirror to the frame. Use strong glue or screws. Make sure it’s tight. A loose mirror can fall. Check all corners and edges. They should be flat and firm. If the mirror wobbles, add more glue. Double-check your work before moving on.
Securing For Safety
Safety is very important. Attach the mirror to a wall. Use brackets or hooks. Make sure they are strong. Test the mirror by shaking it. It should not move. If it moves, tighten the brackets. Always check for sharp edges. Smooth them out with sandpaper. Safety first, always.

Credit: tomsensori.blogspot.com
Adding Finishing Touches
Adding decorative elements can make your funhouse mirror special. Use colored tape or paint to create a border. Stick on stickers or glitter for extra fun. You can also add lights around the edge. This will make the mirror shine. Be careful with glue and small items. Make sure they stick well.
Ensuring Stability
Stability is key to a safe mirror. Use a strong frame. Secure it with nails or screws. Check that the mirror does not wobble. Adding a backing can help. A piece of wood or cardboard works well. Make sure the mirror is even. This will keep it from falling.
Testing Your Funhouse Mirror
Create your own funhouse mirror using flexible plastic sheets. Shape them to create funny distortions. Enjoy the laughter and fun!
Checking For Distortions
Place the mirror in a well-lit area. Stand in front of it. Look closely at your reflection. Notice any distortions. Is your head larger or smaller? Are your legs stretched or squished? Move side to side. Check for changes in the reflection. A funhouse mirror should create funny shapes. Make sure the distortions are consistent and clear. If not, some adjustments might be needed.
Making Adjustments
Gently bend the mirror to change the shape. Use your hands to push or pull. Create different curves. Check the reflection again. Adjust until you see the desired distortions. Tape can help hold the mirror in place. Secure the edges with strong tape. Make sure the mirror stays in shape. Repeat these steps until satisfied. A well-made funhouse mirror should always entertain.
Fun Uses For Your Mirror
Transform a regular mirror into a funhouse mirror using reflective tape. Create wavy patterns for a distorted, amusing effect. Enjoy the playful reflections with friends and family.
Home Decor Ideas
A funhouse mirror can make any room playful. Place it in the living room to start conversations. Kids love seeing their silly reflections. It can add a quirky touch to your bedroom. Put it in the hallway to surprise guests. The mirror will make your home feel unique. It can also work well in game rooms. Add one to your study for some fun breaks. The mirror will always bring smiles.
Entertainment And Parties
Funhouse mirrors are perfect for parties. Guests will laugh at their reflections. They are great for birthday parties. Use them at family gatherings. They can also be fun at holiday events. Set up a photo booth with the mirror. Your guests can take funny photos. It will be a hit at any event. The mirror adds excitement to any gathering. Everyone will have a great time. It’s easy to set up and use.
Frequently Asked Questions
What Materials Are Needed For A Funhouse Mirror?
To make a funhouse mirror, you’ll need a flexible mirror sheet, plywood, adhesive, and a frame. The flexible mirror sheet is essential for creating the distortion effect. Ensure you have all materials before starting.
How Do You Create A Funhouse Mirror Effect?
Create a funhouse mirror effect by bending the flexible mirror sheet. Attach it to a curved plywood base. The curvature distorts reflections, making images appear stretched or squished.
Can I Make A Funhouse Mirror At Home?
Yes, you can make a funhouse mirror at home. With the right materials and instructions, it’s a fun DIY project. Ensure you follow safety precautions while cutting and assembling materials.
How Do You Install A Flexible Mirror Sheet?
To install a flexible mirror sheet, apply adhesive to the plywood base. Carefully press the mirror sheet onto the adhesive. Ensure it’s securely attached and free of wrinkles for the best effect.
Conclusion
Creating a funhouse mirror at home is an exciting project. It’s easy and enjoyable. Gather your materials and follow the steps outlined. Experiment with shapes and angles. Watch how reflections change. This project is perfect for family fun or a science project.
Kids will love the funny faces they see. You don’t need special skills to make it work. Just a bit of creativity and patience. Enjoy crafting your own funhouse mirror and see the world in a whole new way!

My name is Carson Mackey and I specialize in mirror/glass. With over 8 years of experience in the glass/mirror industry, I am well-versed in all aspects of fabrication, repair and installation. I take great pride in providing my clients with the best quality of service and products. I am passionate about my work and strive to help my clients realize their vision.
Honestly, I am dedicated to providing the best services and products to my customers and I’m always open to learning new techniques and working with advanced materials. Basically, this is a place where I will share my thoughts and experiences on Mirror. And this website (http://mirrortopics.com) is an outlet of my deep passion for Mirror.
I want to clear about MirrorTopics that it’s not any agent or hired organization. It fully customize by me. So I hope, posted information will Realistic and authentic. Although I will do enough research before posting but if you notice any wrong or mistake on my article, please contact with me without any hesitation. As well as you can suggest me about content quality, authentication and so on by using our Contact US page. Thank you my friend to support me.