
To draw a ray diagram for a concave mirror, follow these basic steps. First, understand the rules of reflection.
Then, use these rules to sketch the paths of light rays. Concave mirrors, or converging mirrors, focus light to a point. They are used in telescopes, headlights, and many other devices. Knowing how to draw a ray diagram helps you predict how light behaves with these mirrors.
It involves tracing the path of light from an object to the mirror and then to the focal point. This skill is essential in physics and optics. It simplifies complex ideas about light and reflection. Ready to learn? Let’s dive into the steps to draw a clear ray diagram for a concave mirror.
Introduction To Ray Diagrams
Understanding ray diagrams is essential for mastering optics. Ray diagrams are visual tools. They help illustrate how light interacts with lenses and mirrors. Let’s explore their purpose and applications.
Purpose Of Ray Diagrams
Ray diagrams show how light rays travel. They help us understand reflection and refraction. With these diagrams, we can see how light behaves with different objects. They make complex concepts easier to grasp. Ray diagrams are crucial for studying optics.
Applications In Optics
Ray diagrams have many uses in optics. They are essential in designing optical instruments. Cameras, telescopes, and microscopes rely on ray diagrams. They help in understanding how lenses and mirrors work. Ray diagrams also assist in solving practical problems. For instance, they help in determining the image position and size formed by a concave mirror. This makes them invaluable in both education and industry.

Credit: www.youtube.com
Concave Mirrors
Concave mirrors, also known as converging mirrors, are curved mirrors with a reflective surface that curves inward. These mirrors focus light to a single point, making them useful in various applications. Understanding how to draw a ray diagram for a concave mirror is essential for grasping the behavior of light and image formation.
Basic Properties
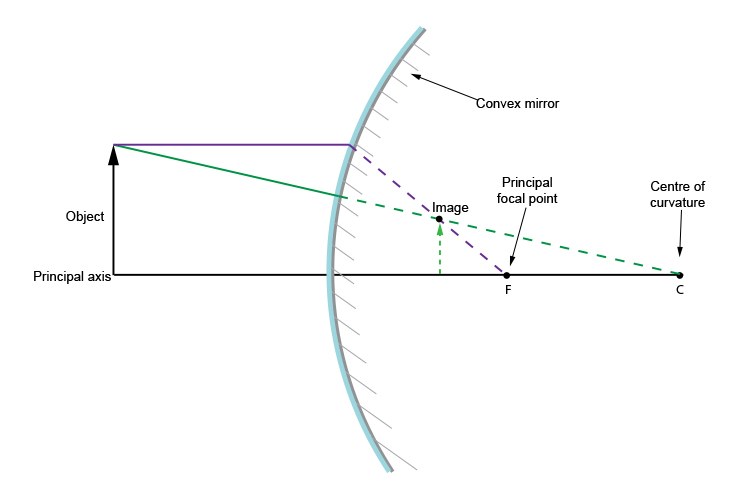
Concave mirrors have some unique properties. They can produce real and virtual images. The focal point, where parallel rays of light converge, lies in front of the mirror.
The principal axis is a straight line passing through the center of curvature and the focal point. The center of curvature is the center of the sphere from which the mirror segment is taken.
Real Vs Virtual Images
Real images form when light rays actually converge at a point. These images can be projected onto a screen. In concave mirrors, real images appear inverted and are formed when the object is outside the focal point.
Virtual images, on the other hand, form when light rays appear to diverge from a point. These images cannot be projected onto a screen. Virtual images in concave mirrors are upright and occur when the object is between the mirror and the focal point.
Essential Tools And Materials
Before you start drawing a ray diagram for a concave mirror, it’s important to gather all the essential tools and materials. Having the right items will make the process smoother and more accurate. Below, we will cover the required instruments and how to set up your workspace.
Required Instruments
To draw a ray diagram for a concave mirror, you will need the following instruments:
- Concave Mirror: The primary tool for this task.
- Ruler: For drawing straight lines.
- Protractor: To measure angles accurately.
- Pencil: A sharp pencil for precise lines.
- Eraser: To correct any mistakes.
- Paper: Use graph paper for better alignment.
Setting Up The Workspace
Creating a well-organized workspace is crucial for accurate ray diagrams. Follow these steps to set up your workspace:
- Clean Surface: Ensure your desk or table is clean and clutter-free.
- Good Lighting: Adequate lighting helps you see your work clearly.
- Organize Tools: Place all your instruments within easy reach.
- Position Paper: Place the paper flat on the surface to avoid any distortions.
- Sit Comfortably: Ensure you are seated comfortably to avoid strain.
By gathering the right instruments and setting up your workspace properly, you set yourself up for success. These steps will help you draw a precise and accurate ray diagram for a concave mirror.
Principal Axis And Focal Point
Understanding the principal axis and focal point is crucial for drawing a ray diagram of a concave mirror. These elements serve as the foundation for accurate diagram representation. Let’s explore these concepts in detail.
Identifying The Principal Axis
The principal axis is an imaginary line. It runs through the center of the mirror. This line extends both in front of and behind the mirror. It helps in aligning other elements in the ray diagram.
Draw a straight horizontal line through the mirror’s center. This is your principal axis. It serves as a reference point for drawing rays and locating the focal point.
Locating The Focal Point
The focal point lies on the principal axis. It is halfway between the mirror’s surface and the center of curvature. The center of curvature is the point from which the mirror’s curve originates.
To locate the focal point, measure the distance between the mirror’s surface and its center of curvature. Divide this distance by two. Mark this halfway point on the principal axis. This is your focal point.
Understanding the focal point is essential. It helps in predicting the paths of reflected rays. This knowledge makes drawing ray diagrams easier and more accurate.
Drawing The Incident Ray
Drawing the incident ray for a concave mirror involves a few crucial steps. This guide will help you understand how to choose the ray path and mark the incident angle. Follow these steps to create a clear and accurate ray diagram.
Choosing The Ray Path
First, decide the path of the incident ray. Common choices include rays parallel to the principal axis or rays passing through the focal point. Each choice will help in constructing the ray diagram accurately. Start by drawing a straight line representing the incident ray on your paper.
If you choose a ray parallel to the principal axis, it will reflect through the focal point. For a ray passing through the focal point, it will reflect parallel to the principal axis. These paths are essential for accurate reflection.
Marking The Incident Angle
Next, mark the incident angle where the ray meets the mirror’s surface. Use a protractor for precise measurement. The incident angle is the angle between the incident ray and the normal at the point of incidence. Draw the normal line perpendicular to the mirror’s surface at the point where the incident ray strikes.
Ensure the angle is accurate to predict the correct reflection path. Remember, the incident angle equals the reflection angle. This principle guides how light behaves with concave mirrors.
Credit: www.physicsclassroom.com
Reflecting The Ray
Understanding how to draw a ray diagram for a concave mirror is key in physics. Reflecting the ray properly ensures accuracy in your diagram. Here’s a step-by-step guide to help you through this part of the process.
Following Reflection Laws
The laws of reflection are simple. The angle of incidence is equal to the angle of reflection. This means the incoming ray and the reflected ray make equal angles with the normal.
- Draw the incoming ray hitting the mirror.
- Mark the point where the ray touches the mirror.
- Draw a normal at this point of incidence.
Make sure your normal is perpendicular to the mirror’s surface. The accuracy of your reflected ray depends on this.
Marking The Reflected Ray
Once you have the normal line, it’s time to draw the reflected ray. Begin by measuring the angle of incidence.
- Use a protractor to measure the angle between the incoming ray and the normal.
- Mark the same angle on the other side of the normal.
This ensures the reflected ray follows the law of reflection.
Now draw the reflected ray from the point of incidence. It should extend outward, making the same angle with the normal as the incoming ray.
This completes the process of marking the reflected ray in your ray diagram for a concave mirror.
Completing The Ray Diagram
Drawing a ray diagram for a concave mirror can be fascinating. Completing the ray diagram involves a few essential steps. These steps help in understanding how light behaves with concave mirrors. Let’s dive into the process with clear and simple explanations.
Intersections And Image Formation
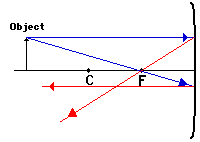
First, draw at least two rays from the top of the object. One ray should be parallel to the principal axis. It will reflect and pass through the focal point. The second ray should pass through the focal point. This ray will reflect and travel parallel to the principal axis. Where these reflected rays intersect is where the image forms. This intersection is key to understanding the image’s position and size.
Labeling Key Points
Labeling is crucial in a ray diagram. Start by marking the focal point (F) and the center of curvature (C). Next, label the object and its position on the principal axis. Clearly label the points where the rays intersect. This will be the location of the image. Use simple labels to avoid confusion. Labeling helps in quickly identifying key elements of the diagram.
Common Mistakes And Tips
Drawing a ray diagram for a concave mirror can be tricky. Many make mistakes that lead to inaccurate results. Here are some common mistakes and tips to help you draw a perfect ray diagram.
Avoiding Common Errors
Understanding common errors is key to improving your ray diagrams. Here are some frequent mistakes to watch out for:
- Incorrect Ray Paths: Rays should follow specific paths. Misplacing them can distort the diagram.
- Wrong Focal Point: Ensure you correctly identify the focal point. It’s crucial for accurate ray intersections.
- Improper Mirror Curvature: The concave mirror should have a consistent curve. Inconsistent curves lead to errors.
By avoiding these mistakes, your ray diagrams will be more precise and reliable.
Enhancing Accuracy
Accuracy is crucial in ray diagrams. Here are some tips to enhance your precision:
- Use a Ruler: Always use a ruler for straight, clear lines.
- Label Points: Label the focal point, center of curvature, and principal axis. This helps in following the correct paths.
- Practice Consistently: Regular practice improves your skill. Try drawing multiple diagrams to get better.
Adopting these tips will help you create accurate and clear ray diagrams.
Practical Applications
Drawing a ray diagram for a concave mirror helps visualize how light behaves. This practical skill aids in understanding image formation. It’s essential for physics students and optical applications.
Drawing a ray diagram for a concave mirror is not just a classroom exercise. These diagrams have practical applications that are important in various fields. Understanding these applications helps in grasping the real-world significance of ray diagrams.Uses In Education
Teachers use ray diagrams to explain the principles of optics. They help students visualize how light behaves when it hits a concave mirror. This understanding is crucial in subjects like physics and engineering.| Grade Level | Concepts Taught |
|---|---|
| Middle School | Basic principles of reflection |
| High School | Image formation and focal points |
| College | Complex applications in optics |
Real-world Examples
Concave mirrors are used in many devices. Here are some real-world examples:- Telescope: Uses concave mirrors to focus light from distant stars.
- Makeup Mirrors: Magnify the image for better viewing.
- Headlights: Reflect light to focus it on the road ahead.
Credit: mammothmemory.net
Frequently Asked Questions
What Is A Concave Mirror?
A concave mirror is a curved mirror with an inward reflecting surface. It converges light to a focal point.
Why Use A Ray Diagram For Concave Mirrors?
Ray diagrams help visualize how light rays interact with concave mirrors. They show the formation of images.
How To Draw A Ray Diagram For A Concave Mirror?
First, draw the principal axis, focal point, and center of curvature. Then, trace rays from the object to the mirror.
What Are The Rules For Ray Diagrams?
Follow these rules: parallel rays reflect through the focal point, rays through the focal point reflect parallel, and rays through the center of curvature reflect back.
Conclusion
Drawing ray diagrams for concave mirrors is straightforward with practice. Follow the basic steps. Use a ruler and compass for accuracy. Start with the mirror’s principal axis. Mark the focal point and the center of curvature. Draw the incident rays and reflect them correctly.
Check your work for accuracy. Practice helps build confidence. Soon, you will draw these diagrams with ease. Remember, understanding the principles is key. Happy drawing!

My name is Carson Mackey and I specialize in mirror/glass. With over 8 years of experience in the glass/mirror industry, I am well-versed in all aspects of fabrication, repair and installation. I take great pride in providing my clients with the best quality of service and products. I am passionate about my work and strive to help my clients realize their vision.
Honestly, I am dedicated to providing the best services and products to my customers and I’m always open to learning new techniques and working with advanced materials. Basically, this is a place where I will share my thoughts and experiences on Mirror. And this website (http://mirrortopics.com) is an outlet of my deep passion for Mirror.
I want to clear about MirrorTopics that it’s not any agent or hired organization. It fully customize by me. So I hope, posted information will Realistic and authentic. Although I will do enough research before posting but if you notice any wrong or mistake on my article, please contact with me without any hesitation. As well as you can suggest me about content quality, authentication and so on by using our Contact US page. Thank you my friend to support me.