
Yes, you need to mirror iron-on vinyl. This step ensures your design appears correctly on the fabric.
Iron-on vinyl, also known as heat transfer vinyl (HTV), is popular for custom clothing and crafts. But many beginners wonder about the mirroring step. It may seem confusing at first. Mirroring means flipping your design before cutting. This ensures the design looks right after you transfer it to fabric.
Skipping this step leads to backward designs. So, why is mirroring so important? Understanding this process can save you time and frustration. Let’s dive into the details and make sure you get perfect results every time.
Introduction To Iron-on Vinyl
Iron-on vinyl is a versatile and popular material for crafting. It allows you to personalize fabrics with unique designs. Whether you’re new to crafting or a seasoned pro, understanding iron-on vinyl can enhance your projects.
What Is Iron-on Vinyl
Iron-on vinyl, also known as heat transfer vinyl (HTV), is a special type of vinyl. It has a heat-activated adhesive on one side. This adhesive bonds to fabric when heated. You can cut iron-on vinyl into various shapes and designs. Then, you apply it to fabric with a heat press or an iron.
Iron-on vinyl comes in many colors and finishes. Matte, glossy, glitter, and even holographic options are available. This variety allows you to create unique and personalized items. The material is durable and can withstand multiple washes.
Common Uses
Iron-on vinyl is commonly used for personalizing clothing. T-shirts, hoodies, and hats are popular items to customize. It is also great for creating custom home decor items. Pillows, tote bags, and aprons can be easily personalized.
Sports teams often use iron-on vinyl for uniforms. You can add names and numbers to jerseys. Schools and organizations use it for spirit wear and promotional items. It is also popular for creating custom gifts. Personalized baby onesies, wedding gifts, and holiday items are just a few examples.
Importance Of Mirroring
Mirroring iron on vinyl is a vital step in creating perfect designs. Skipping this step can lead to improper results. This section discusses why mirroring is crucial and the potential issues if forgotten.
Why Mirroring Matters
Mirroring ensures your design transfers correctly. When you cut the vinyl, the design is reversed. Mirroring flips it back, so the final product looks correct.
- Ensures text is readable
- Keeps designs in the right direction
- Prevents wasted materials
Imagine creating a shirt with text. Without mirroring, the text would be backward. This simple step saves time and frustration.
Consequences Of Not Mirroring
Forgetting to mirror can lead to several problems. The design won’t transfer as intended. Here are some common issues:
- Backwards text and images
- Wasted vinyl materials
- Extra time spent correcting mistakes
Not mirroring means starting over. This can be frustrating and costly. Always remember to mirror before cutting.
Types Of Iron-on Vinyl
Understanding the types of iron-on vinyl is crucial for your crafting projects. Each type has unique characteristics and uses. Knowing these can help you achieve the best results. Let’s explore the different types available.
Heat Transfer Vinyl
Heat Transfer Vinyl (HTV) is a popular choice among crafters. HTV is a material that can be cut, weeded, and transferred to a surface using heat. This vinyl comes in many colors, finishes, and textures. You can create custom designs on fabrics, wood, and other surfaces.
HTV typically requires mirroring your design before cutting. This is because the vinyl is cut from the back. Here is a simple guide to help you understand how to use HTV:
- Cut your design on the shiny side down.
- Weed the excess vinyl from your design.
- Place the design on your surface.
- Apply heat and pressure for the recommended time.
Remember to follow the manufacturer’s instructions for the best results.
Printable Iron-on Vinyl
Printable Iron-On Vinyl allows you to print your designs using a regular inkjet printer. This type of vinyl is perfect for complex designs with many colors. Printable iron-on vinyl is available in both light and dark transfer sheets.
Here is a quick comparison between light and dark transfer sheets:
| Feature | Light Transfer Sheets | Dark Transfer Sheets |
|---|---|---|
| Surface | Best on white or light-colored fabrics | Best on dark-colored fabrics |
| Printing | Designs need to be mirrored | No need to mirror designs |
| Application | Place the printed design face down | Place the printed design face up |
Follow these steps to use printable iron-on vinyl:
- Print your design on the vinyl sheet.
- Cut out the design.
- Place the design on your fabric.
- Apply heat using an iron or heat press.
Always read the instructions provided by the manufacturer. This ensures the best application of your design.
Credit: jennifermaker.com
When To Mirror Iron-on Vinyl
Iron-on vinyl is a popular choice for customizing fabrics. It’s essential to know when to mirror your design. This ensures your project turns out perfectly. Mirroring iron-on vinyl is not always necessary. Understanding when to mirror will save you time and materials.
Design Considerations
When using iron-on vinyl, consider the design’s orientation. Words and intricate designs need mirroring. This prevents backward text or awkward placements. Simple shapes and patterns may not require mirroring. Always check your design before cutting the vinyl.
Material Types
Different iron-on vinyl materials may require mirroring. Heat transfer vinyl (HTV) often needs mirroring. Regular adhesive vinyl usually does not. Check the manufacturer’s instructions for specific guidelines. This helps ensure the best results for your project.
How To Mirror Iron-on Vinyl
Iron-on vinyl is a popular choice for customizing clothing, bags, and more. Learning how to mirror iron-on vinyl correctly is crucial for achieving professional results. This guide will walk you through the necessary steps to ensure your designs come out perfectly.
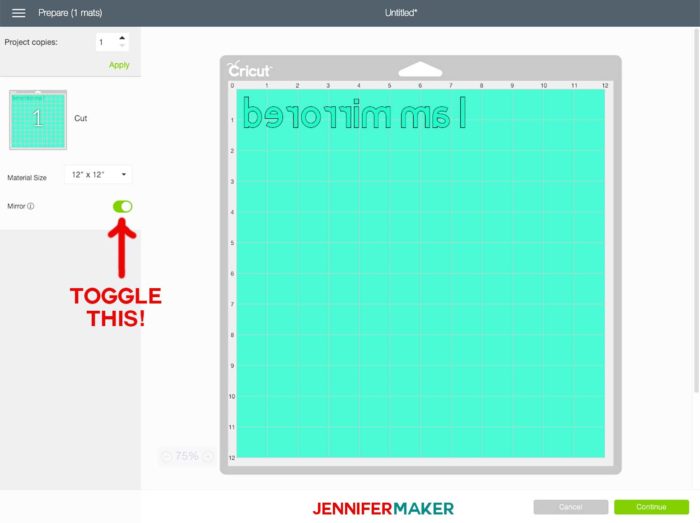
Using Design Software
Most design software includes a feature for mirroring your designs. Follow these steps:
- Open your design in the software.
- Select the entire design.
- Look for the “Mirror” or “Flip Horizontal” option.
- Apply the mirror effect to your design.
Common design software includes Adobe Illustrator, Cricut Design Space, and Silhouette Studio. Each has a straightforward process for mirroring.
Manual Mirroring Tips
Sometimes, you might need to mirror your design manually. Here are some tips:
- Print your design on a piece of paper.
- Flip the paper over to see the mirrored image.
- Trace the reversed design onto the back of your vinyl.
- Cut the vinyl following the traced lines.
Manual mirroring is useful when you don’t have access to design software. It’s a simple yet effective method.
Common Mistakes And Fixes
Working with iron-on vinyl can be tricky. Many people make common mistakes while mirroring the design. These mistakes can waste time and materials. Below are some common errors and how to fix them.
Avoiding Errors
Iron-on vinyl is different from regular vinyl. You must mirror the design before cutting.
- Always double-check the mirror setting.
- Ensure the design is in reverse before cutting.
- Check the cut settings for the correct vinyl type.
Using the right tools is also crucial. A fine blade is best for detailed designs. Regularly clean your cutting mat to ensure smooth cuts.
Correcting Mistakes
Sometimes mistakes happen. Knowing how to correct them is important.
- If you forget to mirror, reverse the design on your software and cut again.
- If the vinyl is not sticking, increase the heat or pressure slightly.
- If the design is off-center, measure and align it properly before pressing.
Using a heat press can help. It ensures even pressure and heat distribution. This leads to better adhesion of your vinyl.
Tools And Supplies Needed
For successful iron-on vinyl projects, having the right tools and supplies is crucial. This ensures a smooth process and professional results. Let’s explore the essential tools and recommended materials.
Essential Tools
You need a few key tools to work with iron-on vinyl. A cutting machine, such as a Cricut or Silhouette, is necessary. This machine cuts your design accurately. A weeding tool helps to remove excess vinyl from your design. Tweezers or a weeding hook can be very useful for this task.
An iron or a heat press is also essential. This tool applies heat to transfer the vinyl to your fabric. A heat-resistant mat or pressing pillow is needed for a flat, stable surface. Lastly, a ruler and scissors come in handy for measuring and trimming.
Recommended Materials
Choosing the right materials ensures your project looks great and lasts long. High-quality iron-on vinyl is a must. This vinyl should be durable and easy to cut. There are many types of iron-on vinyl, so select one that suits your project. Standard iron-on vinyl works well for most fabrics.
Ensure your fabric is suitable for heat transfer. Cotton, polyester, and cotton/poly blends are ideal. Avoid materials that melt or scorch easily. A Teflon sheet or parchment paper protects your project and iron from direct heat. This prevents the vinyl from sticking to the iron.
Pre-washing your fabric removes any coatings that might prevent the vinyl from adhering. This step is important for a strong bond. With these tools and materials, you’re set for a successful iron-on vinyl project.

Credit: teckwrapcraft.com
Best Practices For Perfect Transfers
Creating the perfect iron-on vinyl transfer involves understanding essential techniques. Proper preparation and application can make a significant difference. Following best practices ensures your designs adhere flawlessly.
Prepping Your Surface
Before starting, ensure the surface is clean and smooth. Dust and debris can ruin a transfer. Use a lint roller or a cloth to remove particles.
Next, preheat the surface. This helps the vinyl stick better. Use an iron or heat press for about 5 seconds. This step is crucial for good adhesion.
Finally, align your design. Make sure it is centered and straight. Use a ruler if needed. Proper alignment ensures a professional look.
Application Techniques
When applying the vinyl, use firm and even pressure. Avoid moving the iron back and forth. Instead, press down firmly and hold.
Heat settings matter. Set your iron to the correct temperature based on your vinyl type. Too much heat can damage the material.
Peel the carrier sheet carefully. Wait until the vinyl cools slightly. Then, slowly remove it to avoid lifting the design.
Double-check your work. Ensure all edges are secure. If needed, apply heat again to fix any loose areas.
| Step | Description |
|---|---|
| 1 | Clean the surface |
| 2 | Preheat the material |
| 3 | Align the design |
| 4 | Apply firm pressure |
| 5 | Set correct heat |
| 6 | Peel carefully |
| 7 | Check and fix edges |
Credit: www.youtube.com
Frequently Asked Questions
Do I Need To Mirror Iron-on Vinyl?
Yes, you need to mirror iron-on vinyl. This ensures that your design appears correctly when applied.
What Happens If I Don’t Mirror Iron-on Vinyl?
If you don’t mirror, your design will be reversed. This mistake can ruin your project and waste materials.
How Do I Mirror Iron-on Vinyl?
To mirror, flip your design horizontally in your cutting software. This prepares it correctly for application.
Why Is Mirroring Important For Iron-on Vinyl?
Mirroring is important because it ensures the design adheres properly. Without it, the design will be backwards.
Conclusion
Mirroring iron-on vinyl is crucial. It ensures your design transfers correctly. Always check your settings before cutting. This step saves time and material. Following these tips helps avoid mistakes. Happy crafting!

My name is Carson Mackey and I specialize in mirror/glass. With over 8 years of experience in the glass/mirror industry, I am well-versed in all aspects of fabrication, repair and installation. I take great pride in providing my clients with the best quality of service and products. I am passionate about my work and strive to help my clients realize their vision.
Honestly, I am dedicated to providing the best services and products to my customers and I’m always open to learning new techniques and working with advanced materials. Basically, this is a place where I will share my thoughts and experiences on Mirror. And this website (http://mirrortopics.com) is an outlet of my deep passion for Mirror.
I want to clear about MirrorTopics that it’s not any agent or hired organization. It fully customize by me. So I hope, posted information will Realistic and authentic. Although I will do enough research before posting but if you notice any wrong or mistake on my article, please contact with me without any hesitation. As well as you can suggest me about content quality, authentication and so on by using our Contact US page. Thank you my friend to support me.